10 Tips to Make Your Photos POP
We are all looking for little ways to make your photos come to life. Here are some good tricks to really help with the technical side of the camera, so you can focus on the image you see in front of you.
1. Shoot on RAW
Shoot on RAW so your image is not compressed and you have as much information as possible to work with in post. To counter high dynamic range causing lowered contrast from RAW, be sure to darken blacks and increase saturation or vibrance in post.
2. Set your ISO as low as possible
Always shoot around 100 ISO to greatly increase the quality of your images. You can retain better image quality by shooting with a lower ISO and brightening in post, as opposed to initially shooting with a higher ISO.
3. Set your camera on a tripod
A tripod will enable you to lower the ISO, even in darker situations. Reduce camera shake by setting your camera on a 3-second timer or by using a remote shutter.
Use any light leak covering features on your camera such as the viewfinder cover or lens shade and be cautious of your own movements during longer exposures. Even a slight ground shake can affect the image.
4. Play with panoramic
Shooting a panoramic then stitching or photo-merging can create very clear eye-
popping images. Play with the photo merge feature on Photoshop or Lightroom to create one very high quality image from a few smaller photos.
5. Keep the subject properly lit
Aim to evenly and smoothly light your subject, and use a kicker or rim light to really help define a portrait. Avoid flat light, which can dull images and make them appear unclear and uninteresting. Follow the light!
6. Find the sharpest F-stop for your camera/lens
Find the sharpest F-stop by searching your exact lens by Googling, “sharpest aperture for sigma 18-55mm 1.8.” Check out hyperfocal calculators to really maximize the effectiveness of your F-stop.
Some good tools include: HyperFocal Pro for Android, Hyperfocal Calc for IOS and PhotoPills online.
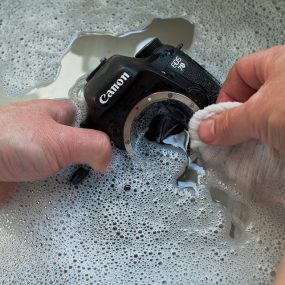
7. Keep your sensor and lens filters clean
Clean equipment results in clean photos. This YouTube video has some good tips on how best to clean your sensor.
8. Brush up on your editing skills
Use the highlights, shadows, whites, and darks sliders instead of contrast for better control. Learn to de-noise and sharpen your images. Use the brush tool to darken and saturate blown out skies to help balance landscapes.
Don’t get carried away. Meet in the middle. If you think you have overdone it with a setting, bring it back halfway for a happy medium. Check out Dave Morrow’s Youtube channel for some insightful editing tutorials!
9. Use “cH” or Continuous High shooting mode when going handheld
If shooting handheld with a shutter lower than 1/50th of a second, using “cH” (or Continuous High) will give your more options to find the clearest image. Delete blurry images right away to avoid tedious Lightroom skimming later on.
CH is especially helpful when shooting portraits, giving you slight variations of expression. This is especially helpful when working with subjects who may be camera shy.
10. Check your background, create foreground
Colors and shapes in the background can distract from the main subject, even if they are out of focus, so place them mindfully.
Create depth by keeping a subject in the foreground, even if it’s something as simple as a branch or part of some rocky terrain. This can add some beautiful dimension to an image.
About Cotton Camera Carrier Systems:
Andy Cotton worked as a Special Effects Supervisor in the film industry for over 26 years. Later, as a professional landscape photographer, he set out to design a camera-carrying solution that was comfortable, secure, and accessible – without moving parts that could fail, jam, or break. So, he designed Cotton Carrier Camera Systems with top-quality materials that are functional and reliable in all situations. www.cottoncarrier.com


