ACCURATE BLACK AND WHITE PHOTOGRAPHY
– Hernan Rodriguez, Commercial Photographer and Datacolor Friends with Vision
It’s interesting how when shooting for black and white photography, most people disconnect the importance of monitor calibration. This might be due in part to the absence of color. It is totally the contrary. Precision and accuracy are of the most importance as now we have to render skin tones, environmental scenes and even wardrobe in different values of black, which will now represent color.
Datacolor’s SpyderX is instrumental in both viewing and image editing, as well as printing for black and white. There should not be any reason for not working on a properly calibrated monitor, as it only takes under two minutes to do with the new SpyderX. You can also easily be making your adjustments on highlight and shadow details for reproduction with complete confidence, due largely in part to the lens-based technology of the SpyderX. I’m a huge advocate of getting it right “in the can”, and that starts with shooting with a SpyderCHECKR, which will record my neutral tone and black / white points for future processing if needed.
SHOOTING FOR BLACK AND WHITE
In order to create impactful black and white portraits, you need to take the appropriate steps and shoot specific for black and white. It is not always optimum to shoot for color portraits and hope for great black and white conversions. Colors such as green and red can easily appear as the same gray value when converted. This can make a portrait appear flat if you have an individual wearing a mid-tone red top, in front of green foliage. On that note, here are a few tips to keep in mind:
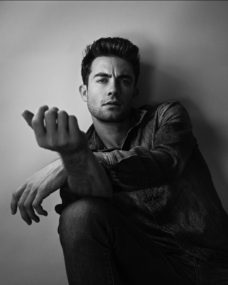
• Wardrobe – It is important to guide your subject in choosing the right color for the session. There are different variations of portraits you as the photographer can create for your clients, such as high-key and low-key, which can include high or low contrast values. If I am shooting a low-key portrait for instance, I can have my subject wear deep rich colors such as navy, burgundy or maroon and deep purples. Khaki, yellow, orange, pink and such colors will render in the lighter tones of the gray scale, unless they are very dark. These can make for great high-key portraits.
• Lighting – Determine the objective of the portrait and light accordingly. If I am shooting for newsprint for instance, low-key lighting might not be the best style of lighting as there is more paper saturation and deep low values will soak up more black ink. Bright brush light will work best in this situation, as in most commercial purposes. The SpyderX can safeguard you to make accurate finely tuned adjustments on a calibrated monitor.
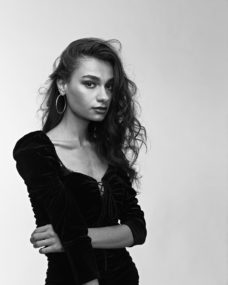
• Quality and Quantity of light – will determine the contrast in your black and white portraits. Choosing a hard-light quality created from an unmodified speed-light, a grid, snoot or beauty dish, will render higher contrast and harder shadows unless filled with a second light source. This can be the best choice when creating images for fashion and beauty or on younger subjects. Hard light sources can display uneven skin texture or wrinkles, which is not always optimum for individuals with flawed skin types. On the other hand, using modifiers that soften and spread the light such as a soft box, scrims, light panels and silk umbrellas can create beautiful soft qualities of light which is great for portraits, beauty, and minimizing wrinkles and uneven skin.
I usually will use such light modifiers, and slightly increase the power of my key light, focused on the face and creating a little more interest for my black and white portraits. Otherwise they can easily become flat.
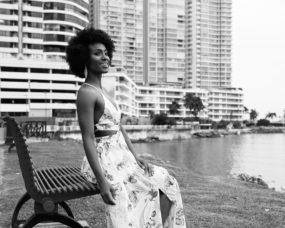
• Match Your Flash Source to the Ambient – when shooting environmental portraits, the first thing I always consider is the qualities of light present in the ambient, whether it be incandescent lighting in a hotel lobby or the hard shadows of mid-day. Lighting needs to appear natural and as if coming from one light source. If I am trying to create an outdoor fashion shot in the middle of the day, using a soft light source on my subject might not be the best option. Think about the soft shadows I would have on my subject opposed to the hard and directional shadows I would have in the scene. You might want to split the difference on your key light by maybe using a soft box with a silver inner lining and without diffusion, which will create a punchy light quality similar to the sun but also not as harsh. Once you convert to black and white, it will look a lot more natural and it will also add focus to your subject.
NATURAL LIGHT PORTRAIT
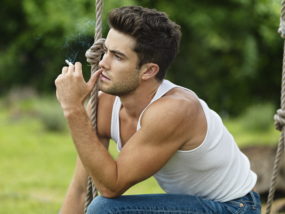
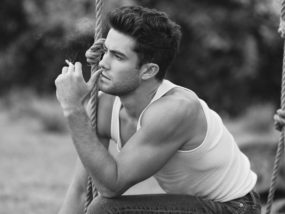
• This shot of Garrett Weston was created on location in natural light with a large white Sun-Bouncer Pro Reflector as my key light source. Garrett wanted to create portraits in the style of Bruce Weber with a “naturalist” portrait appeal. This is one of those instances when the objective of the portrait was to not draw any attention to the lighting – you can say low contrast, as we described earlier.
• I firstly took an ambient reading of the scene. As it was mid-day, I had to position Garrett in “open – shade”, which allowed me to control the contrast balance of foreground to background. To balance the exposure, I chose a background with dark tones, which also gave me the latitude to open up the exposure. I placed Garrett with the sun behind him, which served two purposes. It allowed me to use the sun as a hair light, adding depth and separation to the portrait.
• In calculating the final exposure, I considered shutter speed as a priority. Being that I was shooting hand-held with a 70 – 200mm Tamron lens, I wanted to make certain my speed was at least 1/250th of a second, which allowed me to capture sharp portraits of Garrett as he moved freely in front of the camera. When shooting black and white portraits, a variable zoom lens allows you to compress the background, thus creating fewer distracting elements as the background becomes circles of confusion with lens blur.
NOTE: Lens blur or compression creates blocks of greys, blacks and whites, which keeps the focus on the subject. On a subject with dark hair, you can intentionally position your subject in front of a light section to create separation. You can do the opposite if a subject has blonde or light color hair. The hair light also can be that extra element that creates impact in black and white portrait conversions.
• The final exposure for Garrett’s portrait was 1/250th of a second at f/4.0. ISO 200. Before determining my final exposure, I tested various exposures ranging from f/5.6- 6.3. Choosing an aperture of f/4 kept just the right amount of detail on my subject while creating the desired background blur.
Find out more about Hernan Rodriguez here https://bit.ly/34gSoi1
*Images are © Hernan Rodriquez and may not be in any form without permission.